The Elements of Computing
Systems / Nisan & Schocken / www.idc.ac.il/tecs
Project 5: Computer
Architecture
Objective: Build the Hack computer platform, culminating in the top-most Computer chip.
Resources:
The only tools needed for this project are the supplied hardware simulator and the test scripts described below.
The computer platform should be implemented in the HDL language specified
in appendix A.
Contract:
The
computer platform that you build should be capable of executing programs written
in the Hack machine language, specified in Chapter 4. Demonstrate this
capability by having your Computer
chip run the three test programs given below.
Component testing: We supply test scripts and compare files for unit-testing the Memory and CPU chips in isolation. It’s important to complete the testing of these chips before building the overall Computer chip.
Chips
Build the computer in the following order:
|
Chip (HDL) |
Function |
Test script |
Compare file |
| Memory.hdl | Entire RAM address space | Memory.cmp | |
| CPU.hdl | The Hack CPU | CPU.tst (recommended - requires the usage of the built-in DRegister) | CPU.cmp |
| CPU-external.tst (less thorough but does not require the usage of the built-in DRegister) | CPU-external.cmp | ||
| Computer.hdl | The platform's top-most chip | See below | See below |
Test
Programs
A natural way to test the
overall Computer chip implementation is
to have it execute some sample programs written in the Hack language. In order
to run such a test, one can write a test script that loads the Computer
chip into the hardware simulator, loads a program from an external text file
into its ROM
chip, and then runs the clock enough cycles to execute the program. We supply
all the files necessary to run three such tests, as follows:
Add.hack:
Adds
the two constants 2 and 3 and writes the result in RAM[0].
Recommended test script (requires the usage of the built-in ARegister, DRegister, PC and RAM16K): ComputerAdd.tst
and ComputerAdd.cmp.
Alternative test script (less thorough but only requires the usage of the built-in RAM16K): ComputerAdd-external.tst
and ComputerAdd-external.cmp.
Max.hack:
Computes
the maximum of RAM[0]
and RAM[1]
and writes the result in RAM[2].
Recommended test script: (requires the usage of the built-in ARegister, DRegister, PC and RAM16K): ComputerMax.tst
and ComputerMax.cmp.
Alternative test script: (less thorough but only requires the usage of the built-in RAM16K): ComputerMax-external.tst
and ComputerMax-external.cmp.
Rect.hack:
Draws
a rectangle of width 16 pixels and length RAM[0]
at the top left of the screen.
Recommended test script (requires the usage of the built-in ARegister, DRegister, PC and RAM16K): ComputerRect.tst
and ComputerRect.cmp.
Alternative test scripts (less thorough but does not require the usage of any built-in chips): ComputerRect-external.tst
and ComputerRect-external.cmp.
Before testing your Computer chip on any one of the above programs, read the relevant .tst file and be sure to understand the instructions given to the simulator. Appendix B may be a useful reference here.
Steps
1. Create a directory named projects/05 on your computer and extract project 05.zip to it (while preserving the directory structure embedded in the zip file).
2. Build the computer in the
following order:
§
Memory: Composed from three chips: RAM16K,
Screen,
and Keyboard. The Screen
and the Keyboard
are available as built-in chips and there is no need to build them. Although
the RAM16K
chip was built in Project 3, we recommend using its built-in
version, as it provides a debugging-friendly GUI.
§
CPU:
Can be composed according to the proposed
implementation given in Figure 5.9, using the ALU and register chips built in Chapters
2 and 3, respectively. We recommend using the built-in versions of these chips,
in particular ARegister
and DRegister.
These chips have exactly the same functionality of the Register chip specified in Chapter 3,
plus GUI side effects.
In the course of implementing the CPU, it is allowed (but not necessarily recommended) to specify and build some internal chips of your own. This is up to you. If you choose to create new chips not mentioned in the book, be sure to document and test them carefully before you plug them into the architecture.
§
Instruction
Memory:
Use the built-in ROM32K
chip.
§ Computer: The top-most Computer chip can be composed from the chips mentioned above, using Figure 5.10 as a blueprint.
Tools
The
Hardware Simulator: As in Projects 1-3, all the chips in this project
(including the topmost Computer
chip) can be implemented and tested using the hardware simulator supplied with
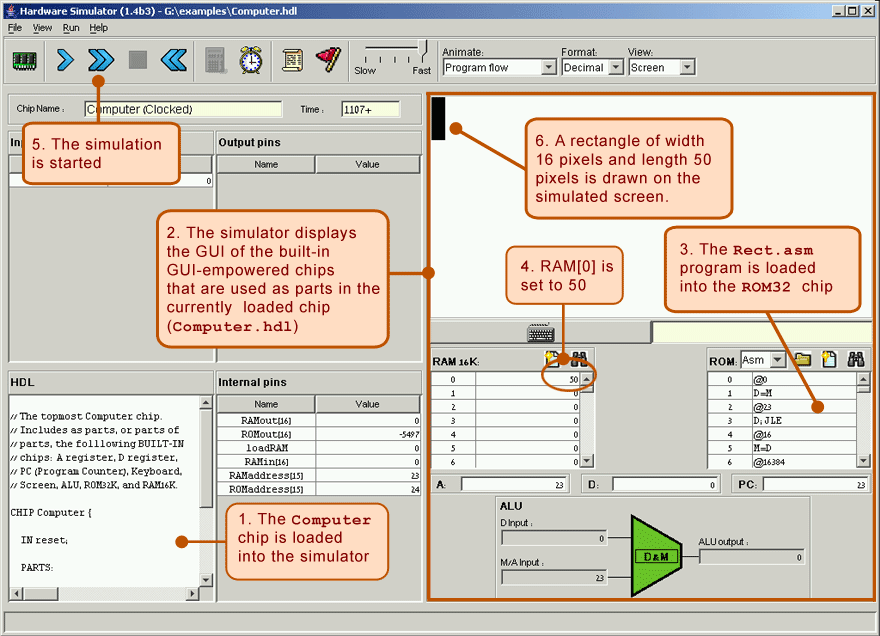
the book. Here is a screen shot of testing the Rect.hack
program on a
Computer
chip implementation.

The Rect program draws a rectangle of width 16 pixels and length RAM[0] at the top left of the screen. Note that the supplied Rect program is correct. Thus, if it does not work properly, it means that the computer platform on which it runs (Computer.hdl and/or some of its lower-level parts) is buggy.